|
|

|

|
|||
|
|
|
|
Important :
Please note that this particular command requires a copy Microsoft Office/ Excel 2000 or higher installed in your computer – in order to run. Otherwise an error message will be displayed.
ImportRectPart is a function that allows the user to import their data of rectangles in text or MS Excel format files (.TXT, .XLS or any text format files) into AutoNEST’s Parts (.VEC files) and Task (.JOB).
If the user requires the rectangles to be displayed in the nested layouts as DXF files instead of VEC files, use the ConvertPart command to convert the .VEC files to .DXF files.
Select the ImportRectPart command icon from the icon menu or from the AutoNEST pulldown menu.
The following dialog box will appear:
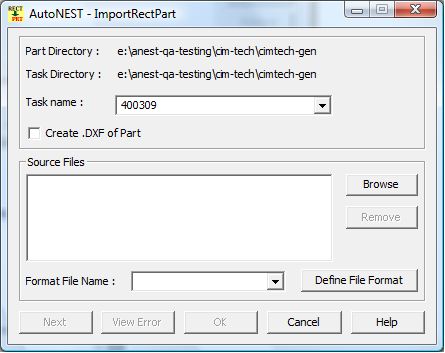
Parts Directory |
Display the default part directory as set in the Sysdata. In this case, it is also the target directory where all imported rectangular parts will be saved. |
Task Directory |
Display the default task directory as set in the Sysdata. By default the task created by the ImportRectPart will be saved in this directory. |
Task Name |
You can enter up to max. 31 characters (space and dot characters are not accepted) for the task name. Enter a new task name or select an existing task. For more information about Task, see Chapter 4.5 TaskEdit. |
Create .DXF of Part |
Mark this checkbox if you wish to create a .DXF file for each of the imported rectangular part. Otherwise leave it un-marked. |
Source Files |
Click the You can select more than one files (but make sure that the files are of the same format) To un-select the files, highlight the file(s) on the list box and click the “Remove” button. |
Format File Name |
You can select from the drop-down list if an Import Format filename has been saved previously. |
Define File Format |
This button will enable you to define the Import file format for your data file(s). A pop-up window will be displayed. |

Format File Name |
Displays the selected Format filename if one has been selected. |
Source File Definition File Format Type |
Select from the drop-down list one of the three file types: •Delimiter •Excel •Fixed Field Delimiter - A Delimited file is where each field is separated by a special character. For example, comma-delimited (.csv) file where “comma” is the character that separates the different fields. See the following example: |
P7B-19,600,1200,7 P7B-20,900,950,1 P7B-22,1100,1400,2 P7B-34,1470,885,1 P7B-36,1360,1200,1 P7P2-1,750,900,10 P7X-1,1620,850,1
Excel - Microsoft Excel spreadsheet Fixed Field - Text format where the data is arranged in well- defined “columns”. Example :- P7B-19 600 1200 7 P7B-20 900 950 1 P7B-22 1100 1400 2 P7B-34 1470 885 1 P7B-36 1360 1200 1 P7P2-1 750 900 10 P7X-1 1620 850 1 |
|
Start Row |
The first starting row number of the rectangular parts. Only numeric inputs accepted. |
Delimiter Character |
Only applicable if you have chosen the “Delimiter” format. For example, if the delimiter is a comma, enter “,” without the quotes. |
Remarks Character |
The special character(s) that denote “remarks”. Obviously rows with these remarks will be ignored during ImportRectPart. |
Units |
You can choose either “Metric” or “Imperial”. |
End Row |
The last or end row number of the rectangular parts. Only numeric inputs accepted. |
Field Name |
The essential field names required by the command. Some are mandatory, while others are optional. •Part Name (mandatory) •X-Dimension “ •Y-Dimension “ •Quantity “ •Filler Quantity (optional) •Orientation “ •Priority “ |
Field Column |
For each field name, indicate the corresponding Column Number as in the data source file(s). Where the `File Format Type’ is “Excel”, you can enter the column number / alphabet.
Where the `File Format Type’ is “Fixed Field” or “Delimiter”, you should enter the column / field number. Please see the following “Fixed Field” example :- Col.1 Col.2 Col.3 Col.4 P7B-19 600 1200 7 P7B-20 900 950 1 P7B-22 1100 1400 2 P7B-34 1470 885 1 P7B-36 1360 1200 1 P7P2-1 750 900 10 P7X-1 1620 850 1 |
|
This button will clear all inputs in the dialog box, enabling you to re-enter from scratch. |
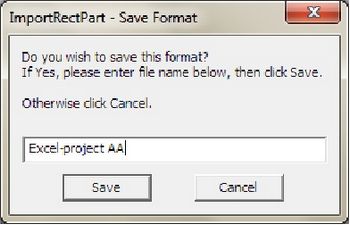
You will see the above “Save Format” pop-up window to enable you to save the File Format definitions into a file for future use.
In the event that you encountered Error Messages during the ImportRectPart process, take note of the following :-
1.Rows numbers indicated in the error messages
2.The specific data on the erroneous rows.
3.The corresponding “Field Name” and “Field Column” specifications in the “Define File Format”.
4.Double-check the above-mentioned inter-related information and make the necessary changes.
5.Try again.