|
|

|

|
|||
|
|
|
|
|
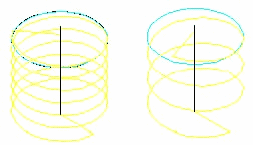
Helical Arcs can be used to make deep holes with a cutter as well as making threads with a thread mill. The benefit of making a regular hole cut with this cycle is that the tool chip load is constant and the tool does not switch back and forth between being loaded and unloaded, which minimizes tool deflection. There are parameters that allow you to have a bottom clean up pass so that there is no small wedge left at the bottom of the hole.
Thread milling can be accomplished with this cycle as well, by using a thread mill and entering in the parameters for the thread pitch. There are parameters that let you start at either the bottom or top of the hole.
Helical Arcs Center will start the tool in the center of the hole and move towards the edge in the lead-in move. |
This cycle will produce X, Y and Z moves on an arc at the machine. The objects used to create this tool path are Geoshaped circles.

Helical Arcs Center tool path.

Helical Arcs Center Parameters
The following parameters effect the toolpath creation:
The desired pitch, in units per one revolution. If you picture the spirals of the helix like threads on a screw, the Helix Pitch is the distance from one thread to the next.
The rotation direction of the pitch, clockwise or counterclockwise. Inputs are
either CW or CCW. If you are threading, this is the setting to make right or left hand threads.
Do an external or internal cut. The possible inputs for this are either Y or N (blank).
Y will give you a tool path on the outside of the geoshaped geometry.
This setting is for a Bottom Clean Up Pass in the cut. Possible inputs are Y or N. If Y is chosen, an extra cleanup pass is made at the bottom of
the hole to remove excess material. This pass is only made at the Total Depth of Cut.
Y is the default. If No is chosen, the tool will feed to the bottom of a pre-cut hole
and start its helical motion upward.
N will leave the lead-in arc radius at its default value. For a different lead-in
radius, acceptable inputs for this field would be radius values in the form of a decimal (i.e. .25, .50, .60).
Choose Y or N.
If Y is chosen, the cycle will have a 180° arc lead-in move based on the full radius of the tool.
Choose Y or N.
If Y is selected, the cycle will have a helical lead-in.
N will leave the lead-out arc radius at its default value. For a different lead-out
radius, acceptable inputs for this field would be radius values in the form of a decimal (i.e. .25, .50 .60).
Choose Y or N.
If Y is chosen, the cycle will have a 180° arc lead-out move based on the full radius of the tool.
Choose Y or N.
If Y is selected, the cycle will have a helical lead-out.
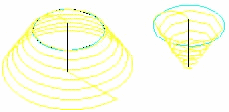
Degrees of angle of cylinder taper. Possible inputs are positive whole number angles in degrees in 1 degree increments (i.e. 10, 20, 45 etc.).
Choose Y or N. N will taper the cylinder outwards or bigger towards the bottom of the hole; Y will taper the cylinder in towards the bottom of the hole.
Choose T or N. N will start in the center of the circle; T will start at the edge of the hole, 'Helical Arcs Edge' cutting cycle.
**Changing values in the cycle parameters may yield unexpected results with some settings or on some geometry. Examine the toolpath and NC Code carefully before running your machine tool if you change these default settings.