|
|

|

|
|||
|
|
|
|
Router-CIM Toolbar: ![]()
Router-CIM Ribbon: 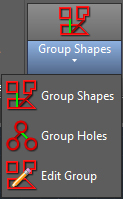
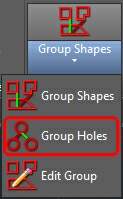
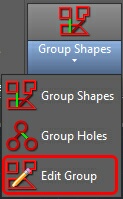
Above is the Group toolbar used for shapes or holes which have been previously Geoshaped. The icons, from left to right are: Group Shapes, Group Holes and Edit Group. The end result will block the shapes or holes together so only one item needs to be selected in the future. This is particularly helpful with large groups of holes or any combination of shapes you wish to cut using the same knowledge.
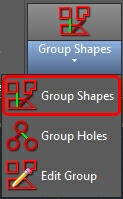
Group Shapes
The first icon in the Group toolbar is for Grouping Shapes. Following are the steps involved to group different shapes together so they may be cut with the same knowledge.
Note: If you group features together that will require multiple passes, the Group Shapes option will go to the first depth on all the shapes and then continue to the next depth on all the shapes until the shapes have been cut to the correct depth. Individual shapes will NOT be cut with all the passes needed prior to moving to the next shape.
1. Geoshape the parts or pieces of geometry first.
2. Click on the 'Group Shapes' icon.
At the command line you will be prompted:
SELECT Shapes to Group Together
Select Objects
3. Window around all the object you want in a group or pick them in the order you wish them to be cut. Left Click then Enter. You will be prompted with:
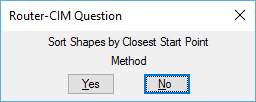
The shapes will turn Red. Choose 'Yes'. You may choose 'No' if you have only a few shapes which you have already chosen in the order you want them cut.
4. At the command line:
Choose First Shape in Packet
Select Objects
Pick on which one you want to be first in the group. Then Enter. You will be prompted with:
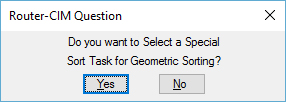
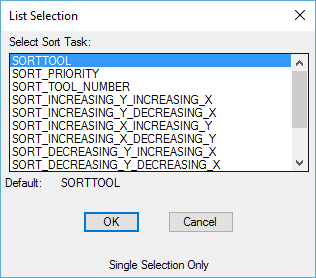
Choosing 'No' will sort the shapes by Closest Start Point method. Choosing 'Yes' will bring up a dialog box allowing you to choose different sorting methods:
5. After selecting either 'No' or Choosing 'Yes' followed by a different sorting method, your parts will be grouped together enabling you to cut them with the same knowledge.
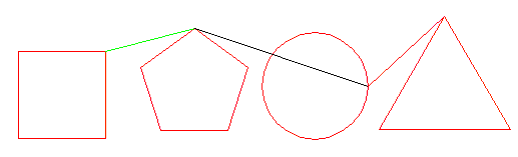
In the picture above the Green line coming off the square indicates the square is the first object in the group and the Red line leading to the triangle indicates the triangle is the last object in the group.
Group Holes
The second icon in the Group toolbar is for Grouping Holes. This option can be very helpful in situations with line boring or any operation involving a large amount of holes.
1. Geoshape the holes first.
2. Click on the Group Holes icon
At the command line you will be prompted:
Select shapes to search for circles:
Select objects:
3. Window around all the holes in your group or pick them in the order you wish them to be cut. Left Click, then Enter. You will be prompted with the following dialog:

4. At this point you may select the holes in two different ways. If you know all of your holes are the same size and you want them in one group you may change the hole parameters from "Diameter" or "Radius" to "All" and then click on 'OK' and you will be prompted with:
5. The holes will turn Red. Choose 'Yes'. You may choose 'No' if you have only a few holes which you have already chosen in the order you want them cut.
6. At the command line:
Choose First Shape in Packet
Select Objects
Pick on which one you want to be first in the group. Then Enter. You will be prompted with:
Choosing 'No' will sort the shapes by Closest Start Point method. Choosing 'Yes' will bring up a dialog box allowing you to choose different sorting methods:
7. If you have a group of holes which are close to the same size, but differ by a small amount and you wish to have them all grouped together, you may do this by using the "Min Size" "Max Size" setting to search for holes within a specified range.
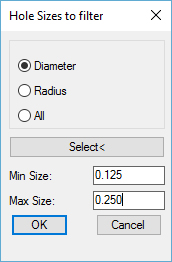
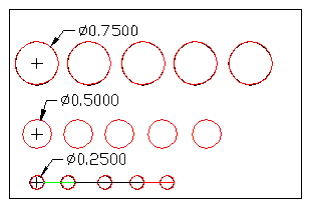
If you had a few holes which happened to be 0.125 in diameter in addition to the ones which are 0.245 and 0.250 and you wanted to center drill all of them at once, you could enter these values into the "Min Size" and "Max Size" fields and Router-CIM will search for them and include them in the group.
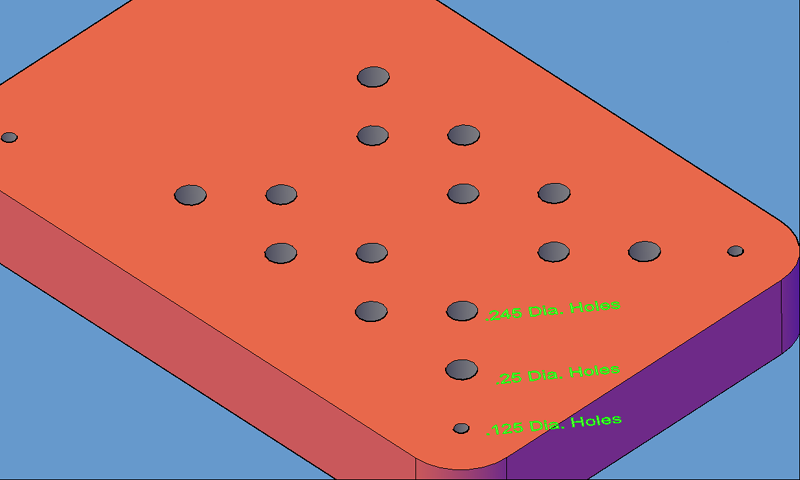
Note: If you have multiple groups of holes in a part which differ in size (i.e. .25, .50, .75 etc.) you can create each group individually based on size if that is preferred.
Edit Group
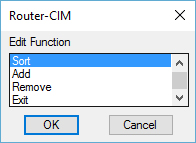
This is the third icon on the Group Shapes tool bar and allows you to Edit the features of a previously created group. This function allows you to Add, Remove, or Sort objects of an existing group.
1. After you have determined which group it is you want to edit. Click on the 'Edit Group' icon.
You will be prompted with:
Select Shape Pack to Edit:
2. Pick on one of the objects which is part of the group.
If you try to pick on the line connecting the pieces, the group will not be recognized.
3. After you select one you will be prompted with the following dialog box:
The Draw function will re-draw the group sorting line on the selected group. The sorting line shows which shape is first (green) which shapes are next (white) and which shape is last (red).
Allows you to pick a different sorting method for the group. By default, the objects will be sorted by the Closest Start Point method.
If you have added additional objects to the drawing you are working on and wish to add them to a current Group, you may do so with this feature. Click on Add, then OK and you will be prompted with
Select Shapes to ADD
Select Objects
Choose the new shape(s) and Enter.
Select Position Shape
The Position shape is the object in the current Group you want to use as a reference for adding the new one. Once selected you will be prompted with a new dialog:
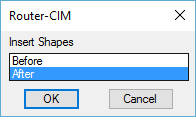
Choose the positioning you want and the object will be added to the existing group.
If you wish to remove objects from a Group in the current drawing you are working on, you may do so with this feature. Click on Remove, then OK and you will be prompted with
Select Shapes to Remove
Select Objects
Click on the one(s) you wish to Remove, then hit Enter. The shape will turn from Red back to Blue (Geoshape color) and will no longer be part of the Group.