|
|

|

|
|||
|
|
|
|
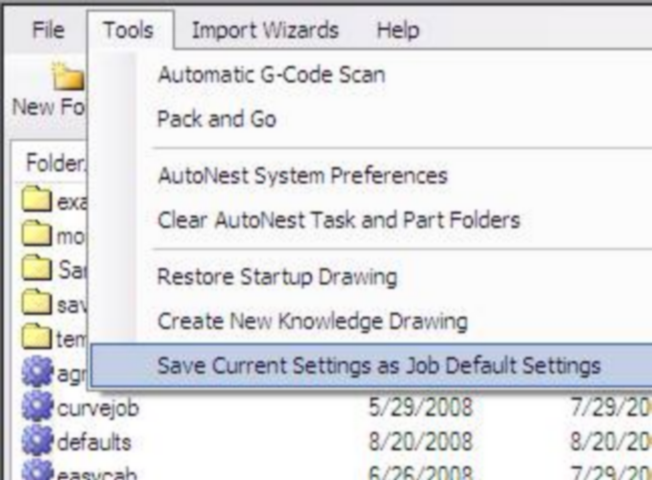
How to create a new label design for Automation using Avery Label Pro
Note: In order to use the Avery products, please refer to the 'Additional Installs' section of the manual.
Follow the steps below to create a new label to be used with Automation Suite. These instructions are for Avery Label pro but can be adapted to many other labeling software solutions.
Router-CIM Automation Suite generates up to 4 different label types in the label.txt file based on your labeling preferences set in Router-CIM Automation Suite. Some of these labels use the same fields so you will need to pay attention to the maps below when assigning overlapping fields to a label.
Type 1) Header labels:
(1 per job) Contains Job information and Router-CIM version information
Type 2) Part Labels:
(1 per part cut) Contains individual part information including nest references for easy part location.
Type 3) Scrap labels:
(1 per left over sheet cut) Contains inventory information for off fall from nesting sheets.
Type 4) Barcode labels:
(1 per NC code file generated) Contains the name of the NC code files to run along with quantity information.
Notes:
Field 1 is intended to STAND OUT and should be a larger, bold, and alternate color (if used) so it is easy to identify.
Field 13 will point to an image and should be sized based ton your label selection and personal preference
Field 15 is ONLY used by a barcode label and should be assigned to BARCODE 3 of 9 font
Open Avery Label Pro.
![]()
At the Start Screen for Avery, click ‘Create a New Design’.
At the Product Selection screen, Choose the label you would like to use and click ‘OK’.
KEEP IN MIND THAT THE SIZE OF THE LABEL DICTATES HOW MUCH INFORMATION YOU CAN USE ON THAT LABEL.
At the Design Strategy screen, click ‘Use an existing list or database file.'
At the Link List to Design screen, change File of type: to read a .txt file and Look in: Automation. Then find the label.txt file, highlight it and click ‘Open’.
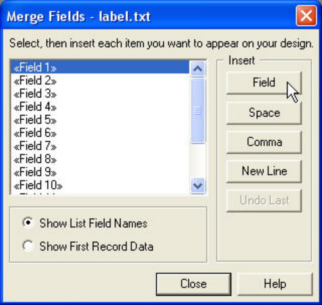
At the Merge Fields – label.txt, Start inserting the fields that you would like to use into the new label design. (See next page for a list of Field Names)
|
Router-CIM Label file map |
|
|
|
|
FIELD # |
HEADER LABEL description |
|
Field1: |
Job name |
* JOB: labels *, |
Field2: |
|
not used, |
Field3: |
|
not used, |
Field4: |
|
not used, |
Field5: |
Router-CIM Version information |
* ROUTER-CIM LABELING *, |
Field6: |
|
not used, |
Field7: |
Router-CIM Version information |
* for Router-CIM 2010 *, |
Field8: |
|
not used, |
Field9: |
|
not used, |
Field 10: |
|
not used, |
Field 11: |
|
not used, |
Field 12: |
|
not used, |
Field 13: |
Points to a blank file so nothing appears on label |
C:\Router-CIM\automation\blank.wmf, |
Field 14: |
|
not used, |
Field 15: |
|
|
Field 16: |
|
|
Field 17: |
|
|
Field 18: |
|
|
Field 19: |
|
|
Field 20: |
|
|
Field 21: |
|
|
|
|
|
FIELD # |
PART LABEL description |
PART LABEL sample data |
Field1: |
Nest ID# |
NEST ID # 5, |
Field2: |
Quantity |
QTY: 5 OF 12, |
Field3: |
Part Name |
PART: 57.DWG, |
Field4: |
Not Used |
not used, |
Field5: |
Description (DWG and DXF files Only) X & Y dimensions (Macro .SCN files Only) |
DESC: RIGHT_SIDE XDIM: 19.8223,YDIM: 48.0000 |
Field6: |
Material |
MATERIAL# 3/4 MDF |
Field7: |
Description (Macro .SCN files Only) |
DESC: RIGHT_SIDE |
Field8: |
Sheet # |
SHEET # MDF75_1, |
Field9: |
Customer Info 1 (Shows as “N/A” if not used in job) |
label1, |
Field 10: |
Customer Info 2 (Shows as “N/A” if not used in job) |
label2, |
Field 11: |
Customer Info 3 (Shows as “N/A” if not used in job) |
label3, |
Field 12: |
Customer Info 4 (Shows as “N/A” if not used in job) |
label4, |
Field 13: |
Part Graphic |
C:\Router-CIM\Automation\wmffiles\5.wmf, |
Field 14: |
backside |
not used, |
Field 15: |
Barcode Graphic |
not used, |
Field 16: |
Customer Info 5 |
label5, |
Field 17: |
Customer Info 6 |
label6, |
Field 18: |
Customer Info 7 |
label7, |
Field 19: |
Customer Info 8 |
label8, |
Field 20: |
NC Code filename without extension |
MDF75_1, |
Field 21: |
Part label multiplier |
1, |
|
|
|
FIELD # |
SCRAP LABEL description |
SCRAP LABEL sample data |
Field1: |
Label Title |
**** SCRAP INVENTORY ****, |
Field2: |
X size of scrap |
XDIM: 19.8223, |
Field3: |
Y size of scrap |
YDIM: 48.0000, |
Field4: |
Scrap qty |
SCRAP QTY: 1, |
Field5: |
Material type |
MATERIAL TYPE# 3/4 MDF, |
Field6: |
|
not used , |
Field7: |
|
not used , |
Field8: |
|
not used , |
Field9: |
|
not used , |
Field 10: |
|
not used , |
Field 11: |
|
not used , |
Field 12: |
|
not used , |
Field 13: |
Points to a blank file so nothing appears on label |
C:\Router-CIM\Automation\blank.wmf, |
Field 14: |
|
not used , |
Field 15: |
|
not used |
Field 16: |
|
|
Field 17: |
|
|
Field 18: |
|
|
Field 19: |
|
|
Field 20: |
|
|
Field 21: |
|
|
|
|
|
FIELD # |
BARCODE LABEL description |
|
Field1: |
|
not used, |
Field2: |
|
not used, |
Field3: |
|
not used, |
Field4: |
|
not used, |
Field5: |
|
not used, |
Field6: |
|
not used, |
Field7: |
|
not used, |
Field8: |
|
not used, |
Field9: |
|
not used, |
Field 10: |
|
not used, |
Field 11: |
Number of sheets to run |
Sheets to run:1, |
Field 12: |
|
not used, |
Field 13: |
|
not used, |
Field 14: |
Stock size required |
Stock Size: 48.00 X 19.82, |
Field 15: |
Name of NCCODE file displayed in barcode 3 of 9 font |
MDF75_1.out |
Field 16: |
|
|
Field 17: |
|
|
Field 18: |
|
|
Field 19: |
|
|
Field 20: |
|
|
Field 21: |
|
|
When you are finished designing your label, it MUST be saved and named RouterCim.lpd
TIP: You should first go to C:\Router-CIM\Automation and rename the existing RouterCim.lpd to a different name. This way, you will always have your original.
The next step MUST be done for this to work!
Open Windows Explorer and go to:
C:\Router-CIM\Automation and rename the file called label.txt. DON’T DELETE IT, just rename it.
Example: label-ORIG.txt
You will need the label.txt in the future to either edit your existing label or to create a new label.
If you ever have to edit your existing RouterCim.lpd, simply open Windows Explorer and go to:
C:\Router-CIM\Automation
then rename the file back to label.txt then double-click on the RouterCim.lpd in the same Automation folder to edit your existing label.
When your are finished editing, don’t forget to again rename the label.txt again.
If you forget to rename the label.txt to another name, it WILL NOT WORK.