|
|

|

|
|||
|
|
|
|
SaveClusterPart command enables you to save selected two or more AutoNEST parts into a cluster.
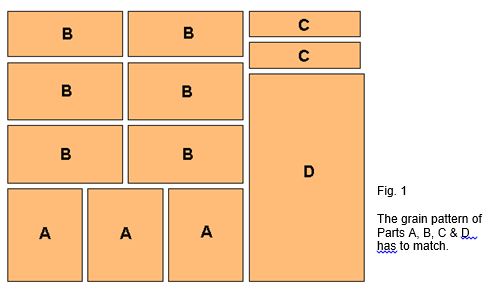
This command is helpful if the group of parts need to match the GRAIN pattern direction so that all parts would look like the that they came from the same piece of material like lumber.
SaveClusterPart assumes that the individual AutoNEST parts have been created before the command is initiated. AutoNEST parts should be arranged in a pattern that you want them to appear on the nested result. Make sure that the parts cutting gap and orientation are correct.
The following prompts will appear at the command prompt when you click SaveClusterPart from the AutoNEST pulldown or icon menu.
Save Cluster-part:
Cluster Name <> :
Quantity <1> :
Insertion Point:
Indicate each individual AutoNEST Part:
Select individual Part (if there are more than one of the same Part, select
them all):
Select objects:
AutoNEST Part Name (? for list) <> : ?
Continue to select individual Part? (Y/N) <Y> :
Window all the parts in the cluster <ENTER> OR indicate the outline of
the cluster <O>:
Select objects:
Proceed to save another Cluster-part? (Y/N) <Y> :
Cluster Name <> :
This is to prompt for the name of the new Cluster-part. (SPACE character is not accepted)
File already exists. OK to overwrite? (Y/N): <N>
This prompt will be displayed if the entered Cluster-part name already exists.
Quantity <1> :
Enter the quantity of the Cluster-part to be nested, if the information is available.
Insertion Point:
This is the pick-up point of the Cluster-part as well as the location for label or tag of the Cluster-part.
Select individual Part (if there are more than one of the same Part, select
them all):
Select objects:
Pick the individual AutoNEST Part to be saved as Cluster-part using any of the available AutoCAD’s Entity Select modes. If there are more than one of the same Part, select them all.
AutoNEST Part Name (? for list) <> : ?
Enter “?” to browse or type-in the AutoNEST Part name.
Continue to select individual Part? (Y/N) <Y>
This will enable you to select another individual AutoNEST part to be saved.
Window all the parts in the cluster <ENTER> OR indicate the outline of
the cluster<O>:
Select objects:
Window or select all the AutoNEST parts in the cluster or indicate your own Outline.
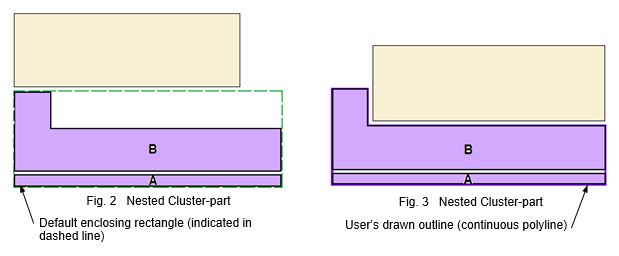
If you select all the parts, by default an enclosing rectangle is formed. This enclosing rectangle (dashed line) serves as the outline for the Cluster-parts (see Fig. 2). If you were to draw your own outline, ensure that the outline is a continuous polyline or circle.
Proceed to save another Cluster-part? (Y/N) <Y> :
This prompt will allow you to save another Cluster-part without quitting the command.
Note: During nesting, no other parts will be nested inside the Cluster-part’s enclosing rectangle even thought there is available space. In the example above, you are recommended to create your own Outline to maximize material.
In SaveClusterPart, the following files of are created:-
•CLS is a text file which record the relative coordinate of part’s insertion point to Cluster-part’s insertion point and part rotation-angle.
•VEC is a text file which record geometric information for a part, such as x, y coordinates of vertices, bulge values for arcs, center point, coordinates and radius for circles.