|
|

|

|
|||
|
|
|
|
Editor Interface
Reference each Macro Operation definition for details of specific edit fields.
Common Editor Fields
There are areas in the Editor pane that are common to all operations. They are:
•Accept, Undo and Reset buttons
•Condition text field and a Condition Builder button
•Layer Override field
•Notes field
|
Text Fields
Upon any change to a text field an edit has taken place. There is no need to acknowledge the edit with Enter or any other key. The TAB key will position to the next text field.
Accept, Undo, Reset
When any change to a parameter is made the Accept and Undo buttons will appear immediately. You should make all edits to any or all parameters before accepting the changes. Press the Accept button to accept all parameter changes. While positioned on the same operation you have the opportunity to Undo your edits. Pressing the Undo button will undo all edits made since the last Accept. After you accept the edits an evaluation of the Macro will be done and the results will appear in the Viewer. You have one addition chance to undo those edits by selecting the Reset button. If you move to another operation Reset is assumed and no reset will be available. Accept, Undo and Reset will cause a complete evaluation of the Macro and the results displayed in the Viewer.
Condition text
Operations can be conditional. This means a condition can be defined to determine whether an Operation will or will not be evaluated, rendered or executed. If a condition is defined and the results is False then the Operation will be ignored. It will not go through the process of evaluation and therefore will not be available for rendering in the Viewer or be able to be executed. If the results of the condition is True then the Operation will be evaluated, rendered and can be executed.
There is a check or X mark that appears to the right of the Condition field that indicates the state of the condition. Either it will be check True or X False. Also, the evaluate column in the Explorer will indicate this as well.
There are two types of Conditions that can be built:
•Simple Condition - a basic condition consisting of a variable name, operator, variable name. The Condition Builder will build this condition through a dialog. See below.
•Complex Condition - a Lisp expression of any type that results in a T or Nil value. A full understanding of Lisp will aid you in building this expression. See AutoCAD Developer Help, AutoLisp functions.
See the Condition Builder below for the format of a Simple Condition.
An example of a Complex Condition using a Lisp expression: (IF (> VALUE1 25) NIL (IF (= VALUE2 10) T NIL))) This example reads as IF VALUE1 > 25 THEN FALSE ELSE IF VALUE2 = 10 THEN TRUE ELSE FALSE. The expression can be as complex as needed up to 128 characters. Also, you can substitute an expression with a variable name that is a logical lisp expression with a limit of 1024 characters. See LocalVar Operation for the definition of a complex logical lisp expression.
Condition Builder
The [Cond...] button will display the Condition Builder:
|
The Condition Builder consists of three fields. The "If Condition" variable, the Operator, the "Result" variable. The first variable is to be compared with the second variable using the operator.
Example: A > B. A is the "If Condition" variable, > is the operator, B is the "Result" variable.
Each of the two variable fields are pull-down menus that provide you with the list of currently defined variables for selection. The Operator field is a pull-down menu of available operators. Also, if you just wanted to enter something like 1 > 0 you could type a 1 for the first variable, select the > as the operator and enter a 0 for the last variable. You can also type in the Condition text field directly the condition and skip using the Condition Builder. OK accepts the condition and Cancel ignores the edits.
Layer Override
When an operation is execute the geometry is defined on an AutoCAD named layer. The name is used for "layer to knowledge" processing in Router-CIM automation. The layer name is crossed referenced to a particular named cutting knowledge to perform tooling instructions. There is a default layer naming convention that is used by the Macro Builder. The layer naming convention is:
Operation Type |
Layer Name |
The chart shows the default layer names when the operation is defined in the Top plane ( see Panel ). When an operation is defined in any other plane the plane name is added to the default name. Example: CUTOUTRIGHT is a CutOut operation on the right side of the Panel. When a Layer Override name is defined that text is added to the default layer name. Example: CUTOUT_ONEPASS is a CutOut operation in the Top plane with a defined layer override text of _ONEPASS. If the CutOut is on the right side of the Panel then the layer name would be CUTOUTRIGHT_ONEPASS. You should always check the layer name given to an operation when it is executed to ensure that you match the correct cutting knowledge to the correct layer name.
|
Panel |
Panel |
|
Dado |
Dado |
|
Saw |
Saw |
|
ToeKick |
ToeKick |
|
CutOut |
CutOut |
|
Drill |
Hole |
|
Profile |
Profile |
|
Pocketing |
Notes
Text that may be provided to give a description to the operation.
The Editor Text Box Usages
Drag & Drop Available Variables
Most Operations have text boxes to enter values. These text boxes can be used to type in appropriate values, variables or formulas.
![]() Note: When located in a text box, use a Mouse Wheel Click and the Available Variables list will pull down. This is a toggle. Click again and the list will roll-up.
Note: When located in a text box, use a Mouse Wheel Click and the Available Variables list will pull down. This is a toggle. Click again and the list will roll-up.
Many times the input to a text box is a predefined variable name. The text box supports Drag & Drop from the Available Variables list that can be pulled-down over the Viewer. The Available Variables list contains all the currently defined variables. By selecting a variable and dragging the cursor to a text box the variable is placed into the text box.
On-the-Fly New Local Variable Definition
There are times when determining what values, formulas or variables to use it becomes necessary to define a new Local Variable. Instead of leaving the editing of the Operation and going to the Local Variables record you can define the variable while editing the text box, on-the-fly.
A Right Click on a text box will show the standard Windows clipboard functions. This can be used in normal clipboard operations.
A Mouse Wheel Click on a text box will show Available Variables list and the Right Click function is changed to the On-The-Fly variable definition mode.
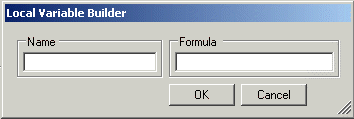
![]() Mouse Wheel Click then Right Click displays the Local Variable Builder.
Mouse Wheel Click then Right Click displays the Local Variable Builder.
|
Enter a variable Name and Formula and press OK. The new variable will automatically added to the Local Variables list and the variable name will be placed in the current text box. |
To return to the standard Windows clipboard functions using Right Click - Select the text box and perform a Mouse Wheel Click.